

Guest Post by Katie Hollingsworth; EQUIPPED Scholar, ECU
As an elementary special education teacher in the adapted curriculum, I am always looking for ways to make my student work more meaningful. Sure, we could cut out pieces of construction paper and use hand-over-hand to get them to put the craft together or we could use verbal prompting to get them to scribble on a piece of paper, but is that truly an image of what my students can do? I think not.
A few months ago, I was talking to my best friend who is also an adapted special education teacher. She was telling me about her new bulletin board that her students helped her to create using turkeys that they created on their own. She was telling me how engaged they were in the activity and how they each created something different than their fellow classmates. Naturally, I asked her how she got her students to become so engaged and what exactly she did to get them to create their own masterpieces. “Glyphs, girl! Haven’t you ever used them?” she asked. I quickly asked her to tell me more and after her explanation, told her how excited I was to try it with my own class!
A glyph, increasingly used in schools by children across the country, is a way to gather and depict data in a creative picture form (Morin, 2016). Answers to various questions determine the components of each project for each student. A legend is typically displayed somewhere near the finished product that tells what each piece of the project stands for. From the completed product, the reader of the will learn something about the student who created the glyph. Not only is it a way to display our students abilities, it’s a creative way to give their work samples some meaning and allow them to differentiate from their classmates to create a product all their own.
Not only do these pieces of work give our student work samples meaning, but it truly gives them a chance to express themselves and answer questions based on what they feel and/or know. For my students who require AAC devices, I put the answer choices on their device so that they can make a choice. For my students who require picture cues, I print out the options to accompany my questions so that they may make their selection. Finally, for my other students who simply require read aloud, I make sure the questions are accessible, meaning they are clearly seen to the students, and point to each word as I read. I think it’s a tool that can truly be utilized among the special education classroom setting. I know one thing’s for sure; my administrators and fellow co-workers enjoy decoding my student responses! It holds so much meaning to know that my students didn’t create these projects because it was something “cute”, they had to participate and answer the questions in order to create their final product. Also, another thing that makes it awesome? Not one of their projects is alike! To the naked eye, it may seem as though their products are similar. However, in taking the time to decode student responses, you will clearly see that no two finished pieces are the same. Below, you will see an example of two pre-recorded AAC devices so that my non-verbal student can make a choice in order to answer a glyph question to create his final product.
Utilizing a tool such as glyphs to engage students in decision-making and comprehension questions to create a finished product all ties in to the three principles of the universal design for learning; specifically principle two: providing multiple means of action and expression. Learners differ in the ways that they can navigate a learning environment and express what they know (The Three Principles of UDL, 2014). For example, students with physical impairments, speech impairments and intellectual disabilities all approach school assignments differently. In all actuality, there is not one specific method of action and expression that will be successful for all learners, which is why providing options for active engagement and expression is critical. In using glyphs as classroom assignments, you can engage the student in questions pertaining to a pertinent topic or event and allow them to express what they take away from the activity in creating their final product.
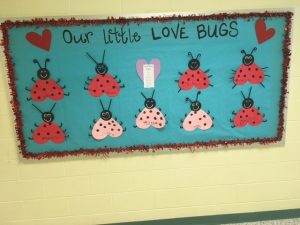
I now consider myself a “Glyph Pro” and often utilize them for our bulletin board outside of the classroom door to display my student’s work. We completed turkey glyphs for Thanksgiving and each one of my student’s turkeys varied based on their answers to Thanksgiving themed questions. We also completed snowman glyphs for the winter months and had our students answer questions about winter activities in order to compile their final product. Our most recent project has been our love bug glyphs, which consisted of Valentine’s Day questions to create the finished piece.
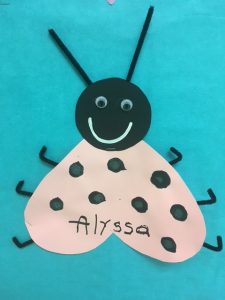
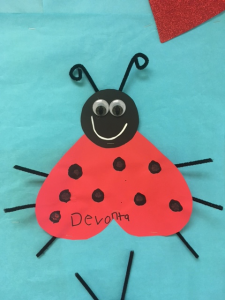
I have included pictures of our February bulletin board that include our Love Bug glyphs that my students have created over the last week. You’ll find below a picture of the entire bulletin board, the glyph key and two student work samples. Want to make your own Love Bug glyph? I have included the materials you’ll need and the questions you’ll need to adapt for your students so that they can create their own love bug!

Love Bug Glyph Materials
- Red Hearts (boy bodies)
- Pink Hearts (girl bodies)
- Black Circles (heads)
- Black Pipe Cleaners (or whatever color, choices are always a plus!)
- Black Paint (it tends to show up better on the red/pink)
- Two Sizes of Googly Eyes (big and small)
- Circle sponge brush
Love Bug Glyph Questions
I am a…
- Boy – Red Body
- Girl – Pink Body
How Old Am I?
- Number of Spots on my Love Bug
I like…
- Fruity Candy – Antennas Up
- Chocolate Candy – Antennas Curled
Who is My Valentine?
- My Dad – Straight Legs
- My Mom – Bent Legs
For Valentine’s Day I’d Rather Get…
- Flowers – Big Eyes
- Candy – Little Eyes
Resources
Morin, A. (2016, January 08). Glyphs and Symbols for Kids. Retrieved February
02, 2017, from http://kidsactivities.about.com/od/Grade-by-Grade/qt/What-Is-A-Glyph.htm
The Three Principles | National Center on Universal Design for Learning. (n.d.).
Retrieved February 02, 2017, from http://www.udlcenter.org/aboutudl/whatisudl/3principles
This is such a great idea for crafts or other activities in the classroom. It’s cool to be able and decode the activity by looking at what each student used like which Valentines they would rather have (candy or flowers.) Love how involved it gets students!
Thanks, Cody! You can adjust these to answer so many questions and go with SO many themes. It really allows your student work to be meaningful!